Friday, 15 August 2008

A bit more!

Right, bit brief t'other day, so thought I add a bit more.

The bonnet was made from the mould and, let's say, it didn't come out quite as well as I'd hoped, but it was done in a real rush!.

I have quite a lot of work to do on it, but it's just sanding and filling, fortunately the shape is ok. So, that's going to be a job for Sunday - I'll take it to work and use air sanders etc on it. I'm only intending to get it useable as I need to get the car mapped, so smooth will be fine with a coat of primer.

Last night I set bonnet the position and got the hinges in place, though they are only "glued" at the moment and need 'glassing in. Just need to do the rear catches, which will be like traditional bonnet catches as I'm trying to avoid "over centre" catches.

Quick word of advice - make sure you mask everything up, in my haste and having the inconvenience of a single car garage, I covered the engine and now I have wishbones, springs, steering gear and bodywork that all has overspray on. Most of it's coming off with thinners and I'm repainting as I go (it needed it anyway), but there's so much...... see pic below, to see what I mean.

I've bought a Turbosmart boost T which I have yet to instal, though it should be going in over the weekend.

Anyway, I took some pics earlier.. here's a good one showing why you should be careful when masking:)
Nearside turbo installation
Offside turbo installation, and yes I will be putting some sort of heat shielding around the steering column!


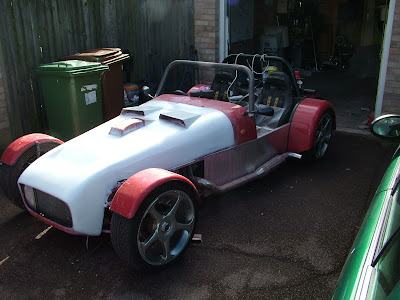
Finally, a pic of the car as it was earlier this evening. I'm quite pleased with the overall look.


If I get my way and can have a few hours on the bonnet on Sunday, and can finish cleaning/repainting chassis and can get the boost t in, I should be able to permanently attach the side panels, connect air filters and reconnect the brakes.

In theory that means I can drive it:)

Further update on Sunday if all goes according to plan (yes you know the one.... best laid plans or mice and men....).

Till then, then.

Sunday, 10 August 2008

Another month. Already!!!

Right, v quick post I'm afraid.

Bonnet has now been made, and needs a bit of finishing. I'll be able to attach side panels to engine this week, then reconnect brake pipes and bleed.

Next will be getting the legal bits done, like fitting headlights and indicators, then finally, off to Emerald for a sesh on their rolling road so it can be mapped.

In the meantime, here to entertain you:

Cool huh.

Anyway, like I said, short post, so till next time...

Wednesday, 9 July 2008

Time flies etc

Well, I hadn't realised quite how quickly the time had gone.
One minute, I've just updated the blog, then two months have gone bye bye. Quite unbelieveable! So apologies to all you millions of watchers. Well, at least one anyway, who's only comment I don't intend to detail.

Well, what's been happening on the car. Let's see now.

Er well bonnet is now nearly nearly done. I'm just being a bit retarded in my ability to apply paint. Wouldn't think it'd be that difficult really, having already sprayed all the bodywork in a previous millenium.
I think the prob has been my lack of time to work on the car and impatience when I can, so when I paint, I paint; and paint and paint. Paint is quite thick, and cracks as it dries. Well it did last weekend, so I left it till Tuesday to dry a bit better. Last night I put on a thin coat of primer filler and did same again tonight. This is of course after I had what I thought was a finished surface. ready for polishing and moulding.
Still, hopefully this Sunday should see me at that stage. Hmm, I'm moulding the bonnet regardless, any imperfections will be dealt with in the mould and the new bonnet.
Hopefully, I'll mould it Sunday, leave for a week, lay up new bonnet the folllowing Sunday and remove that from mould the Sunday after. New bonnet on car by end of July. Promise (but fingers crossed!
Anyway; pics, I'm sure that's all you really want to see, so the following should give you a good idea on how the bonnet looks, but you can't see the cracked paint, so it won't matter. You'll also notice the front roll hoop/windscreen frame is nearly sorted, couple more tweaks and I can weld that up too. It's going to be bolted in, and welded to the rear hoop (which is also bolted in) and theoretically, it should be removeable. There will be two top bars that connect front to rear, a cross piece in the area below the screen and side bars between front and rear. I had all the tubes bent by Anvil Tubesmiths near Seddlescome for a very reasonable price, and nice quick service (2 days)!!

I think the lines are much better than the old. The scoops on top are for the intercoolers. Side exits will be cut into the new bonnet.
Here's side view (nah, really!!)


In this pic you can see the drastic measures I taking to aid cooling. The main panel is outset by three inches. The black bit also has a hole behind it allowing air in, directly towards the turbos. The forward facing scoops (both side panels are the same) have the air filters behind them. What you can't see, though I was hoping you could, is the vent in top of bonnet behind the rad, another cooling aid.


Once front hoop is in and the bonnet is on, I've got to get it on the rolling road to get engine running correctly, then I can use it. Next steps will be tidying car up and thinking about the new diff I have. Ratio is somewhat less than current one (2.88 compared with 3.92) so gearing should improve, and so should economy. I see now reason why 45mpg might not be possible:) Might put a diesel in it next:D

Anyway, I'm going to have a nice cup of tea and some of the rather large bar of Galaxy I got for my birthday.

I'll try and post a bit more regularly, even if not much has happened, though as you might have gathered, I'm expecting to do quite a lot over the next fortnight.

Cheers for now.

Monday, 5 May 2008

Another day, another post!

Thought I'd just post to show you the days work on the bonnet/nose.

I managed to get a good few hours on the car today so am reasonably pleased with the progress:)

Just to give you an idea of the amount of work I've been doing (and trying to justify the amount of time it's taken), this is a pic of the bonnet before I started doing any of the mods.


Underneath that huge scoop are the carbs. It wasn't what I wanted but was more a necessity. That was the first thing to go, so we ended up with this. You'll notice that I've already started playing around with the plenum.

As I wasn't sure what I wanted, but knew what was needed, I ended up with this monstrosity about a year ago, and till last week, this is how the bonnet looked. Now you see why I decided to leave it for a while!
With the intercooler scoops as eyes, the plenum cover as a nose, and the (just visible) radiator vent, it looked badly like a face. Something needed to be done, so....

...off with the intercooler scoops and "nose" over plenum. I also removed the polystyrene bits I was using to widen the lower front of the nosecone - either side of the radiator. Anyway, I had a brainwave and used some steel mesh as a former, which I gradually folled with filler to give me...

I'm aiming for a smooth look, and as you can see in the nest pic, I think I might succeed.


I now "just need to" ( yeah right) get the same finish on the other side (not far off), and figure out how I'm going to cover the intercoolers. Once that's done, it's a matter of finishingall the edges then sanding/painting/sanding polishing to get a really nice finish so I can mould it. After that, it'll be to make a new bonnet, paint and fit, by which time ecu should be in and working, then we'll be off.

I'm hoping to do some work on it in the evenings and next Sunday (finish??????), so, no more till then I'm afraid.

Gotta go!

Simon

Sunday, 4 May 2008

Still no ecu, but hey, I've started the bonnet!

I don't know if it's my failings in the computer world, though I have to admit I do despair at times.

I've decided that my level of competance has dictated I return the ECU to Emerald for them to check over, though I'm sure it's fine. When that comes back, I may have to "phone a friend" from Locostbuilders who's kindly offered to bring his laptop over.

While that's away, I thought I'd make a start on the bonnet, as this is very nearly the last part of the jigsaw, aside of mapping the engine.

When I first started this project, I'd started modifying the bonnet without having any of the mechanical work done, which meant that I didn't know where intercoolers would be, nor the plenum etc, so when I started again last week, I had to pull off all the changes I'd made to the bonnet, as a) it looked crap, and b) well, see a).

It's amazing how having a year between certain jobs where originally you struggle to visualise how you want something to look, and how bad it turns out, to starting again, and getting a decent result in a tenth of the time.

Anyway, you're out of luck if you think I'm going to post pics of what it looks like as of today, because it really does look like a work in progress, but (and it's a very big but like what's the weather going to be like tomorrow) I have a whole day on it tomorrow, which should be all it takes.

In the meantime, here's a couple of pics I took last weekend so I could make up a front rollbar template (with 2" drainpipe). No, you're not seeing that either. I may go and see someone about that next week. They can can it out of something a bit stronger:)

Damn, it's got the rollbar on it, and pics of the bonnet:)

I made those nice shiny exhausts from stainless steel, in case you were wondering.

Anyway, I'm off cos I want an early night so I can get on with car tomorrow.

ZZZZzzzzzzzzzzzzzzzzzzzzzsimon

Saturday, 12 April 2008

Just an update!

I'm still having issues getting the ECU and laptop to communicate, which I suspect is down to the laptop. I'm going to get my old desktop PC out of retirement tomorrow and try that. If it works, I'll buy another laptop (maybe). The alternative is to send the ECU back and have them check it out. Might even send them the laptop too!

Going to the Detling kitcar show tomorrow, so may try and buy a few things - I particularly want/need and Innovate LC1 wideband sensor so when I do get comms between ECU/laptop, I can start getting Air/Fuel mixtures a bit more accurate.

Tomorrow, I have decided will be the day that I start redoing the bonnet. The intention was to include glassfibre scoops on the bonnet for the intercoolers, but to spped things up. I'm going to make them from ally, and rivet them to the i/c's and they'll just have to stick through the bonnet. I did have the mad idea of attaching a small pressure vessel (with slow pressure release) in the wastegate actuator lines to power pressurised intercooler sccops. The idea being the when boost went up, scoops would go up, and as boost went down, the scoops would come down slowly, venting from the pressurised vessel. But I haven't got time for that at the mo.

I've still got the oil leak, but have found this is coming from the oil union on the turbo, so really needs to be fixed asap and before engine is run in anger. Fortunately, should be just a case of tightening a bolt.

Anyway, I'm off for a nice cup'o tea. Keep your fingers crossed, there may be a vid soon!

Till the next time

Simon

Sunday, 6 April 2008

Big Smug Grin, but more later

Right, yet again, it's been a while, but that's what happens in research and development:)


Anyway, ah yes, just had to have a look at the last post to see where we were up to.


I think this may be a long post, quite a lot of progress has been made and I reckon we could well be on the road within two or three weeks. If all goes according to plan.


And we know what happens to people who say that sort of thing.


To start with, some pics.


This is a picture of the engine as it was about a week ago, before I rehashed the wiring to the coil packs (which I don't think you've seen yet - they're mounted on a bracket to the left (as you look at pic) of the water pump). I'd decided that the wires I was using for the coil packs where far too large, so ripped them out and used smaller ones! You'll also notice the lack of HT leads. This proved to be a bit of a headache as a direct result of a lack of knowledge. You see, the Rover V8 had a coil and spark plugs. Go into any spares shop and ask for a set of leads for a Rover V8 and that's what you'll get. Ask for some leads for a Rover V8 that go into a Ford coil pack, and you'll get a blank look. Anyway, I found out, after much toing and froing that you buy ordinary HT leads, pull the coil end rubbers off and stick on an adaptor. Easy. So yes, I have HT leads.


I'd decided that I wanted a more direct route for the top water hose, so had been making a new thermostat housing out of stainless. Well that turned into a right pita, so looked at the Rover item, looked at some scrap ally tube I had, and an idea formed in my head!


Tried the tube on the engine side of housing, perfect fit. Chop down housing so it becomes a flange and insert ally tube. Next I need a fitting therein for rubber hose to connect to, so chop up the remaining outlet for the same, and lo and behold it fits in ally tube (with a bit of turning down). Solder all together, and hey presto. If it fails, I'm going to mould and cast in ally as a single piece. In my hurry, I forgot to put the thermostat in, but that should only take 5 minutes:)


I welded up a couple of stainless ally bends together to give me the rest of the hose.


Gotta apologise for the quality of the next pic, it's a bit blury, but it shows the new alternator mounting bracket that I knocked up. It looks a bit Heath Robinson, but hey, it does it's job. I may even cast one of them in ally at some point.


It should mean that by bonnet profile will be a bit more flexible - ie, I'll have more space under the bonnet.

I finally got round to wiring in the fuel pressure regulator. This is a job I really hadn't been looking forward to doing as it meant I'd have to test the fuel lines. Petrol at 30 - 40 psi I find a scary prospect. Especially when there's what may eventually be two red hot exhausts and glowing turbos no more than two feet either side of the pipe!

Once wired in, I took the plunge and turned on the fuel pump.

Nothing, just lots of whirring. Strange I thought! Anyway, check that fuel was coming from tank to filter, fine, but nothing getting to fuel rail. Hmmm. Check wiring on pump. Ahhhh. Put feed to +. Rewired and tried again.

Don't know why I was worried about fuel lines. Check fuel pressure, and it was about 120psi and pump was starting to struggle. Tried several times and finally got it down to more reasonable 40psi. Still, now I know I have a saftey factor of three reducing to about 2.5 at 1 bar boost pressure. I'm happy with that, though will of course check security of fittings regularly.

The next pic is for all of you who are wondering what I'm doing about air filters. Well, this is my brainwave. I know a cold air supply is desirable, so how about this. The air filters are mounted in the side panels, with a scoop over them. Yes, I have thought they may get flooeded, and I'm thinking about that at the moment. Scoops are vented at the rear, so that may be sufficient. I may just bolt a deflector to the wishbones. There is an ally sheet "box" on the other side if the panel with ally tube ducting to the turbo inlet - can just be seen between panel and coilpack mounting. I might work, though I suspect I may need to get something a little more flexible to go between the two. If you're wondering what the filters are, they're Scooby Impreza jobbies. Replacement filters from Halfords for about a tenner each. If one is good enough for a 200bhp Impreza, two should be plenty for my hoped for 300bhp.


Next job on the list was bascially connect the ECU to the loom and the laptop to the ECU and try and start the car.

Connected everything together, and got no signal from the ECU to the laptop. Contacted Emerald who recommed I try a couple of things (check wiring to ECU and that crank sensor was close to trigger wheel (TW)). Well, I didn't have power to one of the pins, and I sorted out the bracket for TW sensor. Again, I still can't connect to the PC, but I turned the engine over and I started firing. Hell, I'm going to keep going, and see what happens.

IT RUNS.

Badly I'll admit, but I really don't care at the moment. Once started, it ticks over. Starting takes a good few turns as I think cold start enrichment needs looking into, but I think prime need is to set the ignition as it's not been set yet. Getting a bit of turbo whine, which is nice. Also got a couple of leaks that need sorting.

I'm going to order a Boost Tee from Turbosmart today and set that to about 12 - 14 psi, and an Innovate LC1 wideband Lambda sensor/controller.

Got to add how thoroughly impressed I am with the service from Emerald.

Anyway, as you can guess, I'm as happy as a happy person.

Hopefully, next post will have some pics of the progress on the new bonnet, which I have yet to start, and which WILL be done very quickly. By end of April at latest.

I'm also starting to think about my next project, which will be done for a grand:)

For those interested, the Detling Kitcar show is 12/13 April, and I hope to be there for at least an hour or two.

Speak soonish

Simon